What you will need:
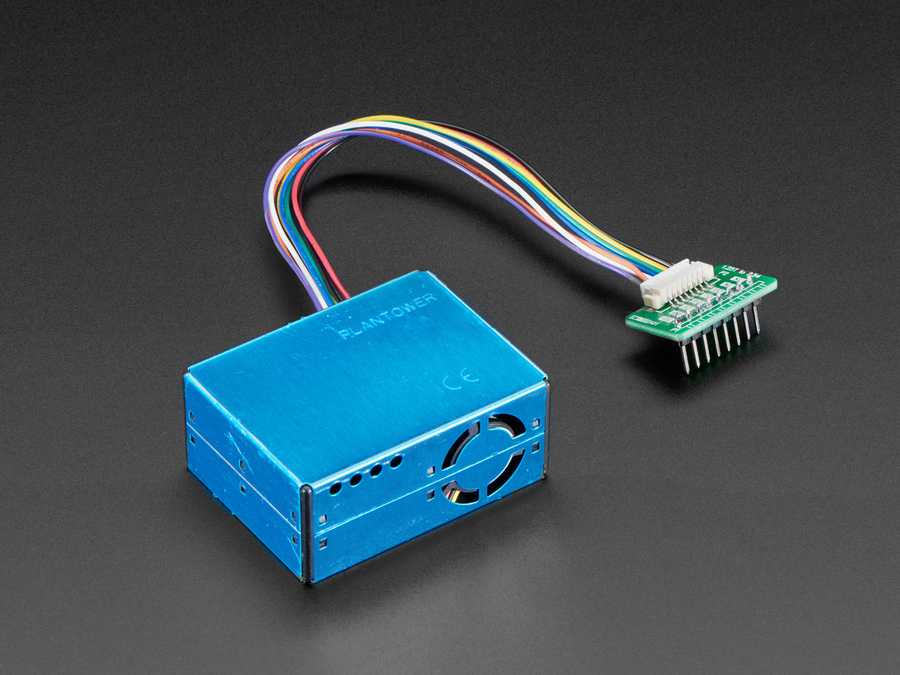
- PMS5003 (pm2.5 sensor)
- Esp8266 (nodemcu)
- Arduino IDE
- Breadboard and cables
- ThingSpeak Account
Project Background
With ongoing fires, air pollution, and many harmful impurities in the air, it’s important to understand how the data you see from air quality maps come to be. This project guides you through how to set up your own iot project to measure pm2.5 (particulate matters), which is a significant factor in calculating aqi (air quality index).
This New York Department of Health article goes more in depth of the health hazards if you are interested: https://www.health.ny.gov/environmental/indoors/air/pmq_a.htm.
This monitoring project is made achievable via pms5003 sensor using light scattering principle, and that coupled with the esp over thingspeak allows for you to access the data from the pms over the internet.
Setting everything up / wiring
This step applies if your purchase came with a connector. If it doesn’t, go to the next step titled wiring from pms to esp.
The wiring for this module to its connector is as follows:
From Right to Left: Pin 1 Vcc: To Power supply (5V) Pin 2 GND: To gnd (negative power) Pin 3 SET: To SET, a TTL input signal Pin 4 RXD: To RXD, serial receiving Pin 5 TXD: To TXD, serial sending Pin 6 RST: To RST, which is reset signal
Be careful not to plug these in backwards.
The descriptions on the sensor saying ttl@3.3V simply indicates that any voltage applied that is below 3.3V will not work/run. That is why, in the next step, we have to connect to 5V on the esp.
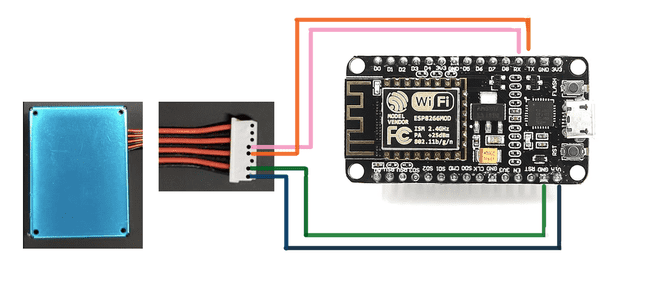
If you skipped here without a connector, just follow the following steps, but use 4 male to male dupont cables directly from the black and red connector strip into the breadboard tie points (or breadholes, as we unironically call them) that match to each pin of the esp. 2 indents on the white connector should match up to the rails in the PMS’s sensor port. If you need to brush up on some breadboard how-to’s, refer to this post here. Remember - each connector and each pin should match to their respective destinations!
The wiring from the pms5003 sensor to the esp8266 is as follows: pms esp Pin 1 Vcc: To Vin Pin (5V) Pin 2 GND: To gnd Pin 3 TXD: To TXD (tx) Pin 4 RXD: To RXD (rx)
You may have realized by this point that wiring is pretty intuitive for the most part - everything just matches up to their names, or their name meanings.
Getting Thingspeak up and Running
Please get a thingspeak account set up. Then, please reference this article, Sending Sensor Data to ThingSpeak, to get some preliminary information on how to send live air sensor data and visualize/analyze said data via http and mqtt. However, instead of a BME280, it’ll be your pms5003 - focus on the setup as well as learning how to send live data, then come back here for a specific walkthrough. You could try this particular section of the Thingspeak walkthrough just to see some cool stuff happen - and to also test if you have all the wifi shenanigans done correctly.
We will be using it to monitor the particulate levels sensed. Create a channel (you can name it air quality system or anything you’d like), and keep track of the url under “white a channel feed” and set it under the correct server name. Again, all is shown in the above linked article if you’re confused.
Use the following code:
The setup loop takes care of making sure wifi is all set up properly. We will be graphing the values in ug/m3, with the x axis being time, or rather just timestamps.
// import statements allow for different types of sensors or controllers to be used
#include <ESP8266WiFi.h>
#include <Arduino.h>

#define LENG 31   // 0x42 + 31 bytes equal to 32 bytes
unsigned char buf[LENG];

// these declarations are used to track the values to then plot into thingspeak. upon initalization they'll be set to 0 as a baseline.
int PM01Value = 0;
int PM2_5Value = 0;
int PM10Value = 0;

// allow for data to be sent to your computer via wifi
const char *ssid = "YOUR_WIFI_NAME";
const char *password = "YOUR_WIFI_PASSWORD";

String serverName = "https://api.thingspeak.com/update?api_key=YOUR_WRITE_KEY";
WiFiClient client;

unsigned long lastTime = 0;
unsigned long timerDelay = 60000;

// the setup loop's purpose is just to ensure connectivity and that your wifi is working
void setup() {
    Serial.begin(9600);

    WiFi.begin(ssid, password);
    Serial.println("Connecting");
    while (WiFi.status() != WL_CONNECTED) {
        delay(500);
        Serial.print(".");
    }
    Serial.println("");
    Serial.print("Connected to WiFi network with IP Address: ");
    Serial.println(WiFi.localIP());
}

void loop() {
    // starts to read when it gets data from buffer
    if (Serial.find(0x42)) {
        Serial.readBytes(buf, LENG);

        // reads the sensor value in this loop and uses previous variable to keep track of it
        if (buf[0] == 0x4d) {
            if (checkValue(buf, LENG)) {
                PM01Value = transmitPM01(buf);  // count PM1.0 value of the air detector module
                PM2_5Value = transmitPM2_5(buf);  // count PM2.5 value of the air detector module
                PM10Value = transmitPM10(buf);  // count PM10 value of the air detector module
            }
        }
    }

// prints out the values read from the sensor out to your computer
    static unsigned long OledTimer = millis();
    if (millis() - OledTimer >= 1000) {
        OledTimer = millis();

        Serial.print("PM1.0: ");
        Serial.print(PM01Value);
        Serial.println("  ug/m3");

        Serial.print("PM2.5: ");
        Serial.print(PM2_5Value);
        Serial.println("  ug/m3");

        Serial.print("PM10 : ");
        Serial.print(PM10Value);
        Serial.println("  ug/m3");
        Serial.println();

        // if able to send data over to thingspeak, it will do so here, and allow it to be displayed. You can look at ts api for clarification as needed
        if (client.connect(server, 80)) {
            String postStr = apiKey;
            postStr += "&field1=";
            postStr += String(PM01Value);
            postStr += "&field2=";
            postStr += String(PM2_5Value);
            postStr += "&field3=";
            postStr += String(PM10Value);
            postStr += "\r\n\r\n";

            client.print("POST /update HTTP/1.1\n");
            client.print("Host: api.thingspeak.com\n");
            client.print("Connection: close\n");
            client.print("X-THINGSPEAKAPIKEY: " + apiKey + "\n");
            client.print("Content-Type: application/x-www-form-urlencoded\n");
            client.print("Content-Length: ");
            client.print(postStr.length());
            client.print("\n\n");
            client.print(postStr);
        }
        client.stop();
    }
}

char checkValue(unsigned char *thebuf, char leng) {
    char receiveflag = 0;
    int receiveSum = 0;

    for (int i = 0; i < (leng - 2); i++) {
        receiveSum = receiveSum + thebuf[i];
    }
    receiveSum = receiveSum + 0x42;

    // check the serial data
    if (receiveSum == ((thebuf[leng - 2] << 8) + thebuf[leng - 1])) {
        receiveSum = 0;
        receiveflag = 1;
    }
    return receiveflag;
}

int transmitPM01(unsigned char *thebuf) {
    int PM01Val;
    PM01Val = ((thebuf[3] << 8) + thebuf[4]);  // count PM1.0 value of the air detector module
    return PM01Val;
}

// transmit PM Value to PC
int transmitPM2_5(unsigned char *thebuf) {
    int PM2_5Val;
    PM2_5Val = ((thebuf[5] << 8) + thebuf[6]);  // count PM2.5 value of the air detector module
    return PM2_5Val;
}

// transmit PM Value to PC
int transmitPM10(unsigned char *thebuf) {
    int PM10Val;
    PM10Val = ((thebuf[7] << 8) + thebuf[8]);  // count PM10 value of the air detector module
    return PM10Val;
}
In a few minutes, you should now see 3 live data plots graphing pm1, 2.5, and 10! Congrats!


