What you will need:
- Adafruit BME280 - You could use any sensor you want, you’ll just have to figure out how to interface with it on your own.
- Adafruit HUZZAH32 – ESP32 Feather Board
- Jumper Wires
- Bread board - Recommended for keeping things organized but not necessary.
- Arduino IDE
- A few Arduino Libraries for connecting to the internet and simplifying using the bme280 (We will get to these later)
- ThingSpeak Account - It’s free for up to 4 channels, which is plenty.
Project Overview
This project is meant to give you a practical example of what you can do with IoT skills. We will be using the esp32 huzzah feather board as our microcontroller because it has the esp32 chip that can connect to the internet. We will use this connectivity to send an HTTP GET request to ThingSpeak periodically so we can chart the temperature where ever we decide to place our device.
Setting up our Board
Install the Arduino ide on your computer by following the instructions here.
Download the proper USB driver for your system here.
Next, we need to install the esp32 board in the Arduino ide. Run your ide and navigate to the preferences window. Enter https://raw.githubusercontent.com/espressif/arduino-esp32/gh-pages/package_esp32_dev_index.json in the Additional Board Manager URLs field. Then open the board manager (Tools > Board > Board Manager) and search for esp32. Now Install esp32. Then open your boards again and select Board > ESP32 Arduino > Adafruit ESP32 Feather. To verify that you have everything set up correctly, you can run the following program to your board:
// Code that runs once at the beginning
void setup(){
  pinMode(13, OUTPUT); // Sets the digital pin 13 as output
}


// Code that runs repeatedly after setup
void loop(){
  digitalWrite(13, HIGH); // Set the digital pin 13 on
  delay(1000); // Wait 1000 ms
  digitalWrite(13, LOW); // Set the digital pin 13 off
  delay(1000);
}
If everything is good, you should see a red light blink on the board.
Installing Libraries
Now we are going to install libraries to make it easier for us to interface with the bme280 and connect to the internet.
Go to Tools > Library Manager, type in Adafruit BME280 Library, and install it. It will prompt you to install other dependency libraries. Select Install All.
Wiring
Connect the following pins with jumper wires (esp32 to bme280): 3V to VIN GND to GND SCL to SCK SDA to SDI You can test if everything is wired correctly by running Adafruits example. It can be found at File > Examples > Adafruit BME280 Library > bme280test. Because we are using I2C with the default pins, we don’t have to modify anything in the example code. Run it and then open the Serial Monitor (Tools > Serial Monitor). You should see readings every second for each of the sensors that look something like this:
Temperature = 24.93 *C
Pressure = 1004.25 hPa
Approx. Altitude = 75.19 m
Humidity = 47.32 %
Setting up ThingsSpeak
First, create a ThingsSpeak account here. Then go to the channels tab and click Create New. Name the channel something like BME280 or Sensor Test, whatever you want. Check the boxes for four fields, and enter the names Temperature, Pressure, Altitude, Humidity. Ignore the rest of the text inputs and click Save Channel.
Now that we have our channel set up, go to the API Keys tab. Take note of the URL under Write a Channel Feed. It should look something like https://api.thingspeak.com/update?api_key=<YOUR KEY>&field1=0. Your key is the most important part and is what will allow you to get to your thing speak channel.
Sending Data to Thing Speak
Now let’s try sending some data to each of our channels four fields. Try out this code. Make sure to replace “ssid” with your wifi name, “password” with your wifi password, and the “serverName” with your own from ThingSpeak.
// Import nessesary libraries
#include <WiFi.h>
#include <HTTPClient.h>

// Set our wifi name and password
const char* ssid = "YOUR_WIFI_NAME";
const char* password = "YOUR_WIFI_PASSWORD";

// Your thingspeak channel url with api_key query
String serverName = "https://api.thingspeak.com/update?api_key=YOUR_WRITE_KEY";

// Assign some variables to allow us read and send data every minute
unsigned long lastTime = 0;
unsigned long timerDelay = 60000;


void setup() {
  Serial.begin(9600); // Opens up the serial port with a baudrate of 9600 bits per second


  WiFi.begin(ssid, password); // Attempt to connect to wifi with our password
  Serial.println("Connecting"); // Print our status to the serial monitor
  // Wait for wifi to connect
  while(WiFi.status() != WL_CONNECTED) {
    delay(500);
    Serial.print(".");
  }
  Serial.println("");
  Serial.print("Connected to WiFi network with IP Address: ");
  Serial.println(WiFi.localIP());
}


void loop() {
  if ((millis() - lastTime) > timerDelay) { // Check if its been a minute
    if(WiFi.status()== WL_CONNECTED){ // Check to make sure wifi is still connected
      sendData(1, 2, 3, 4); // Call the sendData function defined below
    }
    else {
      Serial.println("WiFi Disconnected");
    }
    lastTime = millis();
  }
}


void sendData(double temp, double pres, double alt, double hum){
  HTTPClient http; // Initialize our HTTP client


  String url = serverName + "&field1=" + temp + "&field2=" + pres + "&field3=" + alt + "&field4=" + hum; // Define our entire url

  http.begin(url.c_str()); // Initialize our HTTP request

  int httpResponseCode = http.GET(); // Send HTTP request

  if (httpResponseCode > 0){ // Check for good HTTP status code
    Serial.print("HTTP Response code: ");
    Serial.println(httpResponseCode);
  }else{
    Serial.print("Error code: ");
    Serial.println(httpResponseCode);
  }
  http.end();
}- First we define your home wifi credentials,
ssidandpassword. Webeginour connection and wait. - Every minute we call the
sendData(1, 2, 3, 4);function. In the function we take the paramaters and add them to oururlquery string. - Finaly we send the
GETrequest andprintto the serial that we sucseded.
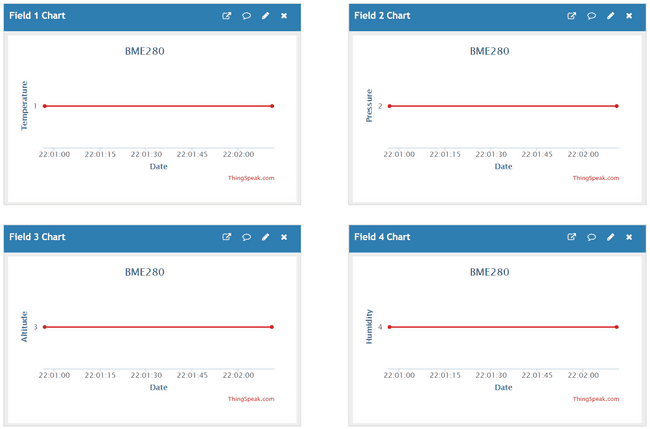
Again check the serial monitor to see if you connected to wifi and when the data is sent. It will take 60 seconds to send first and then send again every 60. You should see the points show up on your charts.
Right now we are just adding the values 1, 2, 3, and 4 to the charts repeatedly. Let’s try to get our live sensor data in there now.
Sending Live Data to ThingSpeak
Now we are going to combine everything to finaly get our data from the sensor then send it to our ThingSpeak channel. You will probobly want to clear your channel before you start getting real data. To clear it go to Channel Settings and click Clear Channel at the bottom of the page.
// Import nessisary libraries
#include <WiFi.h>
#include <HTTPClient.h>
#include <Wire.h>
#include <SPI.h>
#include <Adafruit_Sensor.h>
#include <Adafruit_BME280.h>

// Set our sealevel pressure
#define SEALEVELPRESSURE_HPA (1013.25)


const char* ssid = "YOUR_WIFI_NAME";
const char* password = "YOUR_WIFI_PASSWORD";


String serverName = "https://api.thingspeak.com/update?api_key=FL36D2MOEQ9HTM86";


unsigned long lastTime = 0;
unsigned long timerDelay = 60000;

Initialize the bme280 object
Adafruit_BME280 bme;


void setup() {
  Serial.begin(115200);


  initBme280(); // Initialize the bme280


  WiFi.begin(ssid, password);
  Serial.println("Connecting");
  while(WiFi.status() != WL_CONNECTED) {
    delay(500);
    Serial.print(".");
  }
  Serial.println("");
  Serial.print("Connected to WiFi network with IP Address: ");
  Serial.println(WiFi.localIP());
}


void loop() {
  if ((millis() - lastTime) > timerDelay) {
    if(WiFi.status()== WL_CONNECTED){
// Read data from our bme280 object and pass it to our sendData function
sendData(bme.readTemperature(), bme.readPressure() / 100.0F, bme.readAltitude(SEALEVELPRESSURE_HPA), bme.readHumidity());
    }
    else {
      Serial.println("WiFi Disconnected");
    }
    lastTime = millis();
  }
}


void sendData(double temp, double pres, double alt, double hum){
    HTTPClient http;


    String url = serverName + "&field1=" + temp + "&field2=" + pres + "&field3=" + alt + "&field4=" + hum;

    http.begin(url.c_str());

    int httpResponseCode = http.GET();

    if (httpResponseCode > 0){
      Serial.print("HTTP Response code: ");
      Serial.println(httpResponseCode);
    }else{
      Serial.print("Error code: ");
      Serial.println(httpResponseCode);
    }
    http.end();
}


void initBme280(){
  unsigned status;

  status = bme.begin();
  if (!status) {
      Serial.println("Could not find a valid BME280 sensor, check wiring, address, sensor ID!");
      Serial.print("SensorID was: 0x"); Serial.println(bme.sensorID(),16);
      Serial.print("        ID of 0xFF probably means a bad address, a BMP 180 or BMP 085\n");
      Serial.print("   ID of 0x56-0x58 represents a BMP 280,\n");
      Serial.print("        ID of 0x60 represents a BME 280.\n");
      Serial.print("        ID of 0x61 represents a BME 680.\n");
      while (1) delay(10);
  }
  Serial.println("BME280 Initialized");
  Serial.println();
}- First we initialize the
bmeobject and call theinitBme280()function to ensure that we have the sensor connected correctly. - We then pass
bme.readTemperature(),bme.readPressure(),bme.readAltitude(SEALEVELPRESSURE_HPA), andbme.readHumidity()into oursendData()function from before.
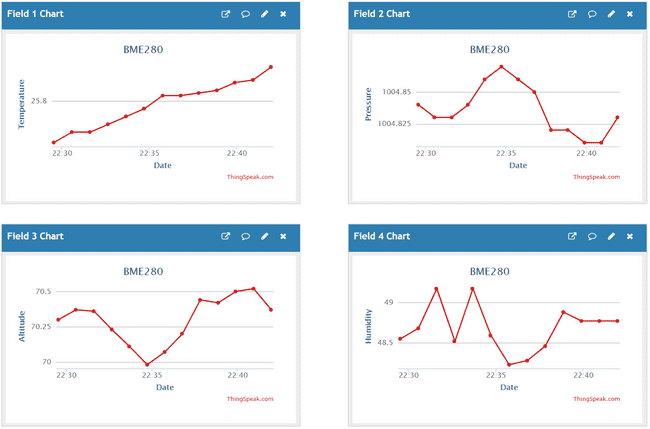
Congrats! You should now have live data once a minute. If you ever want to change that time, simply change the timerDelay to the number of millis you want it to wait.
Whats next?
Hopefully, from this, you have learned enough to be able to figure out how to send any kind of data you want to ThingSpeak so you could explore some more on your own.
- There are some other kinds of visualizations that ThingSpeak has available for your data that you could check out.
- Make your channel public and share it with your friends.
- Try reading data from ThingSpeak using GET requests, as shown in the API Keys tab.
-
You could also want to add something to catch if the network goes down and then keep trying to reconnect so that you don’t ever have to restart your device.

