What you will need:
- Adafruit BME280 - You could use any sensor you want, you’ll just have to figure out how to interface with it on your own.
- Raspberry Pi (RasPi) - I’ll be using a 4B, but you should be able to use any model you want with wifi.
- Jumper Wires
- A few python modules for simplifying using the bme280 (We will get to this later)
- ThingSpeak Account - It’s free for up to 4 channels, which is plenty.
Project Overview
This project is meant to give you a practical example of what you can do with IoT skills. We will be using the RasPi because it has a wifi chip and GPIO (General Purpose Input Output pins). We will use this connectivity to send an HTTP GET request to ThingSpeak periodically so we can chart the temperature wherever we decide to place our device.
Setting up our RasPi
Make sure you have python3 and pip set up first.
Next, we have to enable I2C on our RasPi. I2C is a common protocol for sending data. In your shell, run sudo raspi-config in the shell. Then select Interfacing Options > I2C > yes.
Now we are going to install some python modules. In your shell run pip3 install RPI.GPIO then pip3 install adafruit-blinka then pip3 install requests
Wiring
Connect the following pins with jumper wires (RasPi to bme280): 3V to VIN 3V to CS GND to GND SCL to SCK SDA to SDI If your not sure, here is the pinout for most RasPis.
Reading the BME280
Let’s verify that we have everything wired and set up correctly by attempting a read. Try out the following code:
# Import necessary modules
import board, busio, adafruit_bme280

i2c = busio.I2C(board.SCL, board.SDA)

bme280 = adafruit_bme280.Adafruit_BME280_I2C(i2c)
bme280.sea_level_pressure = 1013.4

# Printing out our temp, humity, pressure, and altitude data by refencing our bme280 object.
print("\nTemperature: %0.1f C"  % bme280.temperature)
print("Humidity: %0.1f %%"  % bme280.humidity)
print("Pressure: %0.1f hPa"  % bme280.pressure)
print("Altitude = %0.2f meters" % bme280.altitude)- First, we created an
i2cobject that we can reference by passing in ourboard.SCLandboard.SDApins. -
The we created a
bme2280object by passing in ouri2cobject. We reference this object to get readings from our sensor.- The
sea_level_pressureof thebme280is defined for my location. Depending on where you are this might be different
- The
- Finally we
printour data by referencing ourbme280. Don’t worry if you don’t understand the%0.1f. It’s just a way to format strings.
When you run the code, you should see something like this in the shell:
Temperature: 23.1 C
Humidity: 80.9 %
Pressure: 1004.9 hPa
Altitude = 70.90 meters
Setting up ThingsSpeak
First, create a ThingsSpeak account here. Then go to the channels tab and click Create New. Name the channel something like BME280 or Sensor Test, whatever you want. Check the boxes for four fields, and enter the names Temperature, Pressure, Altitude, Humidity. Ignore the rest of the text inputs and click Save Channel.
Now that we have our channel set up, go to the API Keys tab. Take note of the URL under Write a Channel Feed. It should look something like https://api.thingspeak.com/update?api_key=<YOUR KEY>&field1=0. Your key is the most important part and is what will allow you to get to your thing speak channel.
Sending Data to Thing Speak
Now let’s try sending some data to each of our channels four fields. Try out this code. Make sure to replace “YOUR_WRITE_KEY” with your own from ThingSpeak.
# Import the request module
import requests

queries = {"api_key": "YOUR_WRITE_KEY",
               "field1": 1,
               "field2": 2,
               "field3": 3,
               "field4": 4}
r = requests.get('https://api.thingspeak.com/update', params=queries)
if r.status_code == requests.codes.ok:
    print("Data Received!")
else:
print("Error Code: " + str(r.status_code))- First, we create a dictionary object,
queries. This is a cleaner way to add the queries at the end of our URL. For example the key-value pair"api_key": "YOUR_WRITE_KEY"would add?api_key=YOUR_WRITE_KEY. - We then pass the
queriesdictionary, and the beginning of the ThingSpeak URL to our requests modules GET request. An HTTP GET request is a way for us to communicate over the internet. - The result of the request is assigned to the object
r. We then check if thestatus_codeis ok, meaning that our data was successfully received by ThingSpeak. If the status is not ok, we report the error. Here is a list of status codes if you want to learn more.
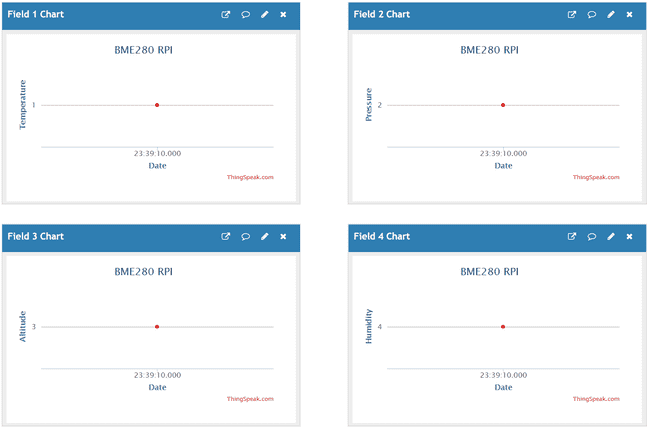
When you run this, you should see one point of data in each of the four fields on ThingSpeak and Data Received! in your shell.
Right now we are just adding the values 1, 2, 3, and 4 to the chart. Let’s try to get our live sensor data in there now.
Sending Live Data to ThingSpeak
Now we will combine everything to finally get our data from the sensor and then send it to our ThingSpeak channel. You will probably want to clear your channel before you start getting real data. To clear it, go to Channel Settings and click Clear Channel at the bottom of the page. We are also using the python scheduler module, which will allow us to set an interval for polling data.
# Import necessary modules
import board, busio, adafruit_bme280
import requests
import sched, time

# Set up I2C and bme280 objects
i2c = busio.I2C(board.SCL, board.SDA)
bme280 = adafruit_bme280.Adafruit_BME280_I2C(i2c)
bme280.sea_level_pressure = 1013.4

# Create our scheduler to run every n seconds
s = sched.scheduler(time.time, time.sleep)
interval = 60

# Definition to read sensor data and send it to ThingSpeak
def read_and_send(sc):
	# Read bme280 and set the query string
    queries = {"api_key": "YOUR_WRITE_KEY",
               "field1": round(bme280.temperature, 2),
               "field2": round(bme280.pressure, 2),
               "field3": round(bme280.altitude, 2),
               "field4": round(bme280.humidity, 2)}
    # Send the request to ThingSpeak
    r = requests.get('https://api.thingspeak.com/update', params=queries)
    # Verify that ThingSpeak recived our data
    if r.status_code == requests.codes.ok:
        print("Data Recived!")
    else:
        print("Error Code: " + str(r.status_code))
    # Re-add this definition to run again in n seconds
    s.enter(interval, 1, read_and_send, (sc,))

# Add our read_and_send task to the scheduler and run it.
s.enter(interval, 1, read_and_send, (s,))
s.run()
We use the sched module to easily repeat every n seconds. If you ever want to change that time, simply change the interval to the number of seconds you want it to wait.
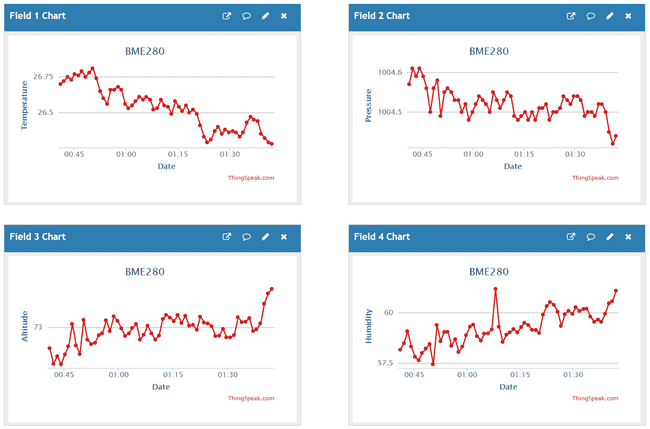
Congrats! You should now have live data once a minute.
Whats next?
Hopefully, from this, you have learned enough to figure out how to send any kind of data you want to ThingSpeak so you could explore some more on your own.
- There are some other kinds of visualizations that ThingSpeak has available for your data that you could check out.
- Make your channel public and share it with your friends.
- Try reading data from ThingSpeak using GET requests, as shown in the API Keys tab.


